How to Disable seeing option

Facebook recently update new facility SEEN option in chat box.When you  are chating  with someone on Facebook, and the person read your message, it displays ‘seen’ along with the time when message was
read.actually this is a best feature but some times it is problem to it allows your friend to know that your ignoring message from them when your not giving reply back.

  In past you can just skip the conversation by not giving reply back or pretended as you dint saw the message but know this trick fails as soon as you saw the message it mark as read and it shows as 'SEEN BY' or 'SEEN ON'.

Visible Online for Whom You want

Now you can visible online for whom you want.By using this trick you can chat with only with the persons whom you want.

  • Just go to Advanced chat settings by clicking on Gear icon in chat bar.


  • Then a pop up arises  just like below screen capture.


  •     Now click Turn On chat for Some Friends
  •     Now add your friends in the options


  • Finally click save option.

Download facebook photo Album in a single click

No one has too much extra time for downloading photos one by one. here is some tricks for download  Facebook photo album with a single click,all you need is to just go to app named Facebook2zip.com

Steps For Downloading photos


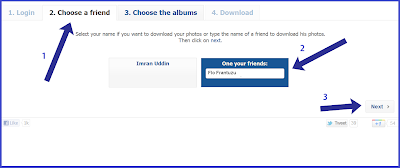
  Step1:  As soon as go the above app you are asked to Login with facebook just like in above picture.


  Step2:  Now choose your friend from whom you want to download photo album.


  Step3:  Now choose the album what you want to download.


  Step4: Now your download will be ready and you can download the photo album by clicking on Download button to desired location on your PC

There are many applications to Download Facebook Photo Albums but this method seems to be easiest,fastest and safest method.
Hope that you liked this short tutorial on How To Download Facebook Photo Album.

Remove Facebook adds

Nowadays Facebook Showing many Adds there is simple way to remove Facebook adds by using Facebook cleaner

In the above photo you can see Circles on the Adds by using Facebook cleaner you can remove Facebook Adds.

Trick to update blank status

1.Trick to update blank status

Now you can update your Facebook status as blank.first "log in"  to your Facebook account.

  Now enter @[3:3: ] in your status box
(Note : One  @[3:3: ] is for One  line)


If You want to update your blank status as long statement the paste the code again below the code just like below
                                         @[3:3: ]
                                         @[3:3: ]
                                         @[3:3: ]
                                         @[3:3: ]
                                         @[3:3: ]
                                         @[3:3: ]
                                         @[3:3: ]

Titling your Facebook Post

You can change the title tag and descriptions of any post you share on Facebook to suit your needs (Especially useful for SEO purposes). This will ensure you’re getting the right message off to your friends.

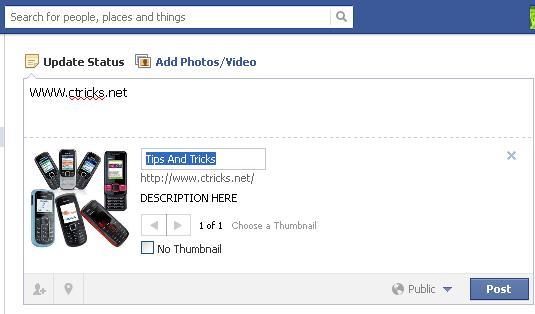
1. After you pop the link into your status box, you can hover over the title of the post. (Highlighted in yellow).


2. Click on the title and it turns into an editable box.


3. Enter your desired text and press enter.


4. Customize the description using the same steps.


The Great Barrier Reef ....photography

They say that daylight has a colour temperature of around 5500 K, but out to sea under a blue sky, this isn’t always the case. It’s funny how our habits as photographers change – or should I say, how my habits have changed. When shooting film, I’d usually have an ultraviolet (UV) filter on my lens ‘to take the blue out’.

While invisible to the human eye, ultraviolet radiation generally records as blue on colour film and as haze on all films. It has a similar effect on digital sensors as well, but of course, many of us don’t believe in using filters anymore.

There is an argument that states, why would you want to degrade the quality of your lenses by placing another piece of glass (or, heaven forbid, plastic) in front. If the lens designers thought a filter was a good idea, surely they would have included it as part of the design. This argument fails in several places, of course, but even so, given digital photography allows us to adjust our image files so easily, many ‘essential’ filters are no longer used. And in any event, the majority of UV filters were sold for ‘protection’ of the front lens element, and you could clean them with a dirty sock if you had to because, if scratched, they were not as expensive to replace as the front lens element.

Not that I ever cleaned my lenses with a dirty sock. Ever.


Here’s the original exposure with the white balance in Capture One Pro 6 set to ‘Shot’ mode. In other words, this is the white balance setting suggested as a starting point by my camera. Of course, capturing raw files means I can change the white balance to any setting I like when converting the file. According to Capture One Pro 6, the Kelvin is 7943 K and the Tint is set to 3.0.

Note, there are no adjustments made to this file at all – it is effectively straight out of the camera. However, you can see quite clearly that it is ‘daylight’ over Australia’s Great Barrier Reef, so what happens if I set the white balance in Capture One Pro 6 to ‘daylight’ (or if I had set the white balance to daylight on my camera)?


At a 5500 K daylight setting, the photo is considerably bluer. And this isn’t what I remember seeing, either. The human eye when coupled to the brain is an incredible imaging device, not only adjusting the ‘exposure’ but also filtering out colours. I remember very clearly how strong and vibrant the colours over the shallow reef were compared to the darker blues of the deep water outside. This colour contrast is lost due to the overpowering blue colour cast.

I’ve taken a dozen helicopter rides over the Great Barrier Reef and every time it is different. In August, I was on Hamilton Island, giving a workshop with David Oliver and Bruce Pottinger. We do this every year and one of the highlights is the helicopter ride over Whitsunday Island and then out to the reef.

On this day, there was a strong southerly wind and the air was very hazy, which means that the images are lacking in contrast. The greater the distance, the more haze you look through and we’re at around 1500 feet (from memory). So, while I didn’t have an ultraviolet filter with me, I could use Capture One Pro 6 to tweak the colour temperature (just a little warmer) and increase the contrast. I also added an adjustment layer to darken down the sky at the top.

At the outskirts of Monte Fitz Roy, Argentina... Photography


Alpine Stream under Monte Fitz Roy

Above El Chaltern and well before Monte Fitz Roy, deep in Patagonia, there’s a wonderful national park with some very photogenic walking  tracks. Even better, you can hire some of the young mountaineers in the area who will carry your gear from camp to camp, just for a bit of training (and a small amount of cash).

We’d spent a couple of nights at a camp above El Chaltern, waiting and watching the weather as it crossed the ranges in the distance, and now we were walking ten kilometres across to the base of Cerro Torre and a second camp. This stream was at one of our rest stops, but a rest from walking inevitably saw us wandering around with our cameras, looking for things to photograph.

I loved this oddly shaped rock, seemingly a towering mountain on a micro scale, surrounded by a flooding stream. Well, perhaps my imagination was getting away with me, but I thought it looked interesting enough to pull out my camera.

There are two techniques used for capturing this image.

The first is the use of a tilt-shift lens, a Canon TS-E 24mm on an EOS 1Ds Mark II. Canon has since upgraded both. Generally speaking, a tilt-shift lens is used to reduce distortion. When photographing buildings, rather than pointing your lens up to include the top of the building (and creating unwanted converging vertical lines), you shift the lens upwards while keeping the camera back parallel to the building. The result is a technically correct perspective.


However, if you shift the lens and tilt the camera the opposite way, you can distort the edges of the image, effectively stretching the scene. This works well with the distant mountains, stretching them so they look a little higher than they actually appeared through a wide-angle lens.

The photo below shows the straight photo without the lens shift. Note the height of the mountains in the background.
Compare this with the following image that includes a lens shift, and a re-framing of the image as well. The two compositions are very similar, but not identical, but the main difference is that the mountains loom larger and appear more impressive. I like this!

The second technique is the use of a neutral density filter. The ND filter allowed me to lengthen my shutter speed. This exposure is 60 seconds at f8 (it’s a 10x ND filter), during which time the water is recorded as a silvery smear and the clouds have also been beautifully blurred.
Compare the result with the same angle taken at a more conventional 1/250 second (see the previous photo). The clouds are more distinct and the water has much sharper reflections. In comparison, I like the ND filter effect because it takes the photographs one step away from reality.
In the days of film, we had to deal with reciprocity failure and colour shifts because the different layers in the film had different responses to light. I think some digital sensors are similarly affected with colour shifts at very long exposures and this shows up as a colour cast. This is the original exposure from the Canon EOS 1Ds Mark II before editing in Capture One.

The magenta colour cast can be quite enchanting, but not for every photograph you take. Fortunately, it’s an easy matter to correct the colour balance – simply use the White Balance Picker in Capture One and the image’s natural colours immediately appear.


To process this image, I also had to make some strong adjustments to the Brightness and Saturation. I also added in three Local Adjustments, lightening up the middle ground and adding a little sharpening to the rock.

Black & White at Rio Fitz Roy, Argentina...Photography

One of the best aspects of landscape photography is the opportunity to visit some amazing places and to experience nature on your own. And it’s funny that even in the most majestic and photogenic locations, what takes our eye are the little details tucked in a corner. This is a classic case of all the elements coming together in an unexpected way.

Now, admittedly I might love this photograph more than you do. After all, it comes attached with lots of emotional baggage when I look at it, whereas other people may simply see an oddly shaped rock sitting on the edge of a stream.

The Patagonian trek above El Chaltern in Argentina reveals some incredible vistas, but you’re reliant on the weather cooperating. On this particular day, the cloud was thick and low, the temperature cold. We had woken at dawn and crunched our way along a frosty dirt track, heading towards the edge of a glacial lake at the foot of Cerro Torre. We could see the near edge of the lake, but not the far shore, nor the towering peaks behind. It was a white out.

However, just being in this location was reward enough and if there weren’t big vistas, perhaps there were more localised opportunities. I started exploring the river where it left the glacial lake and began its descent to the valley floor below.

I stopped to take a few images, using a neutral density filter and a long exposure to blur the water as it flowed along. Each exposure was around two minutes, so while I was waiting for the exposure to finish, I would keep my circulation going by hopping around and clapping my hands together for warmth. And then it started to snow.

Now, for someone who lives in the snow, this was probably not a remarkable or even interesting occurrence, but for an Australian who rarely sees snow (unless travelling, of course), it was a memorable experience. Huge flakes, twice the size of a 1 Euro coin, floated gently down and at one point, it was difficult to see the rock I was photographing because the flurry was so heavy.

As the visibility reduced, I became very aware of the sounds around me – or the lack of sound. Apart from the river itself, there was nothing else. Just me.

The snow flurry lasted less than a minute, but the experience has remained for many years and every time I look at this photograph, I enjoy reliving it.

Whether your photos are visual masterpieces or happy snaps doesn’t really matter.

There were two photographs from this session which I loved, and this one I chose to turn into a black and white. As you can see from the original exposure (below), the file is relatively flat as you would expect under a low, overcast sky.


I find when creating black and whites that I get the best results when I start with a good quality colour file. Turning this original capture into black and white without also developing the tonal range would not create a satisfying result.

In fact, compare the colour photo below with the black and white image at the beginning of the article – both have the same series of local adjustments used to enhance the trees, the stream and the rock, and to darken the background and foreground.

I think both versions work quite well, but which one do you prefer? The colour or the black and white? Or, has talk of the snow flurry put you off the photograph completely?

The golden hour at Monte Fitz Roy...Photography

Fitz Roy Sunrise

Most landscape photographers have heard of the ‘al pen glow’, ‘alpine  glow’ or the ‘golden hour’.  It’s generally meant to describe sunlight before sunrise or after sunset, the light coming from below the horizon and being reflected off airborne snow, water or ice particles in the atmosphere. Photographers like it because the light bounced back to earth is strongly colored and looks great in photographs.

While you can get an alpine glow anywhere, it seems to have its strongest manifestation in alpine regions. Indeed, when I think of Patagonia, I recall images of towering peaks photographed in dramatic lighting with rich reds and oranges. Or perhaps it was just my diet of National Geographic magazines that gave me this impression.

I camped out in the foothills of Monte Fitz Roy in Patagonia for a few nights, hoping to see the mountains lit by the alpenglow in the early morning. I would have preferred the evening alpine glow because then I could sleep in, but sunset wasn’t going to be much use because the mountains would be backlit.

Luck didn’t seem to be on our side when I went to bed that night. It was overcast and drizzling, so unless something dramatic happened, we were in for a drab and grey morning.

The alarm woke me at an ungodly hour. I was travelling with Darren Leal and a group of photographers, and Darren had in mind a location called Duck Lake from which we could photograph Monte Fitz Roy. As I stepped out of my tent, I looked towards the sky, hoping to see stars, but there were none. In fact, the cloud seemed thicker and heavier, if anything.

Even though our viewpoint was only a kilometre or so away, you never know what the weather is going to do and dawn was still an hour away. We grabbed our cameras and tripods and headed along the trail.

From time to time I’d look skyward, hoping against hope for a miracle, but there were no stars to be seen and, after a while, I lost interest. Maybe the following morning would be better. I concentrated on the path ahead which was becoming rougher and more difficult, my torch-light leading the way.

About ten minutes later, I saw a strange light on the ground in the distance. It was a most unusual shape and it took me a little while to work out what it was: the lake. Even better, the light was the clear blue sky being reflected off its glassy surface.

The weather had changed overnight, clearing completely and so the cloud I had seen in camp was a band of rising mist or low cloud. As the light grew stronger, the mountain range began to glow above and in the lake. We had clear weather, all we needed now was the alpenglow to come.

We did get a little alpenglow that morning, but it wasn’t like the photos I had seen in National Geographic all those years ago. Interestingly, we got some great colour at sunrise, but the pre-dawn remained silvery.

Despite this, I love the soft light at this time of the day and, with a little help from Capture One, I was able to bring the colour out.


The original file (above) shows how the camera recorded the scene. I was using a Canon EOS 1Ds Mark II, rated at ISO 800, using a 100mm Macro lens. There are lots of lovely details in the rock faces and the rising cloud bank seems perfectly positioned – I couldn’t have asked for a better morning.

What I noticed was that there is already a good deal of red and orange in the mountain rock faces, so by increasing the colour saturation in the file, I’m able to create my own alpenglow. However, using the saturation slider alone was not the solution as you can see below.


When using the saturation slider alone, not only are the reds and yellows enhanced, so are the blues of the sky. The effect looks a little unnatural. What I want to do is increase the colour saturation in the reds and yellows without touching the blues.

This is where Capture One Pro can help. Using the Advanced Colour Editor tool, I used the Pick Color Correction tool to select the colours on the mountain face. I then increased the Smoothness to include similar colours, and then increased the Saturation slider to bring the mountain side to life.


Sometimes I will select two or three similar colours and increase the saturation of all three, but to a lesser extent individually. This produces a similar strength, but it is spread over a wider range of colours and looks a little more natural.

Peter Eastway is a professional photographer and photography magazine editor based in Sydney, Australia. To see more of his photography, visit http://www.petereastway.com/. Peter also offers an online Landscape Photography MasterClass. Details can be found at http://www.betterphotography.com/.

In The Shadow of Mount Ararat...photography

Mount Ararat in Turkey is steeped in history and tradition. Just prior to this photo being taken, we were on a mountain opposite Ararat viewing what many believe are the remains of Noah’s Ark. If not Noah’s, it’s certainly in the shape of a huge ‘boat like’ structure, but how it came to be resting several thousand feet above the valley floor, no one could tell me!

These are Kurdish women and we assumed this was their village. The main road is behind us and we had stopped to admire the view of Mount Ararat. The air was so clear that even distant objects seemed very close.

However, just below the road, our guide Mehmet spotted these women having a chat. He walked down and started talking to them. They seemed to be friendly enough, enjoying a laugh, so I wandered down too. I sat off to the side, not able to understand a word that was said. Mehmet later explained that he didn’t understand much of their dialect either, and perhaps that was why they were all laughing so much.

Mehmet spent probably 10 minutes talking to the women before he asked if he could take a photograph (our guide is also a keen photographer).

More laughter followed and the matriarch acquiesced, but the point to take away is the process Mehmet went through.

Rather than just stumbling on these people and pulling out a camera straight away, Mehmet spent time talking to them. This is far less confrontational. Imagine if you were sitting in your front yard and some Kurdish tourists walked by and started photographing you? You mightn’t be so worried if you were in a public place like a market or a showground, but in your own home, you’d probably be a little concerned about who these people were.

By spending time talking to people, you can allay their fears. Once they knew we were a bunch of photographers from Australia, just having a holiday in Turkey, suddenly we’re no longer a threat. They know something about us.

This doesn’t necessarily mean they want us to take their photograph, of course. The woman in the background didn’t want the camera pointed at her, although she changed her mind when Mehmet offered them a small monetary thank you.

Note, we didn’t offer to pay them up front. All the photos were taken first and it was only when he was leaving that Mehmet offered the matriarch some money. He did this because he knew how tough life could be in this part of the world and he just wanted to show his appreciation.

I don’t have anything against paying to take a photograph. It’s true that it can change the nature of the relationship between the photographer and the subject, but for photographs like these, it’s not really that important. I’m not working as a documentary photographer or a photojournalist; rather I want to take an environmental portrait that shows how these women live.

However, there may be times when the subjects are used to being photographed (many people in cities and at popular tourist destinations are quite savvy) and ask for a small contribution. Personally, I think this is a fair exchange.


Everything about this scene is as we found it, the only difference is that instead of the women focusing on themselves, they are looking up at Mehmet and another photographer who is standing camera-left out of frame.  Yet by having the matriarch conversing with Mehmet, and the other women reacting, the image begins to tell a story.

As there were 10 of us taking photographs (Mehmet was quite amazing in organising this), we only had time for a few frames each. However, shooting with a wide-angle lens, I was able to position myself to the side and allow the matriarch to focus on the others while I quietly clicked away.

A wide-angle lens is often considered taboo for portraiture. The reason is because a wide-angle lens stretches subjects towards the edge of the frame, making them look fatter and heavier than they really are. However, if you don’t place your subjects on the edges of the frame, then the stretching doesn’t happen (well, it doesn’t happen to them).

In defence of the wide-angle for environmental portraiture, the expansive angle-of-view provides context for the subjects, and when you’re in an exotic location like Eastern Turkey, it’s definitely sensible to make the most of the landscape.

What to Do With a Wet iPhone

Need to know how to rescue a wet iPhone? Though the Internet may be filled with images of unfortunately cracked iPhones, in general, the iPhone is pretty durable.  It is going to survive most drops and bumps, most time you get food on it, and a case will do just about everything to increase its life span.  The real death sentence for the iPhone is going to be liquid, and if your iPhone is ever submerged in a good amount of water it may be done for.  Unless you act fast.

The first thing you have to note is that you cannot take your iPhone in to Apple Support if it has gotten wet.  There are sensors on the iPhone that will activate when water touches them and will indicate to the person looking at it that the user has exposed it to water, and warranties or Apple Care will not cover this.  Even if you try to get it past them and simply report problems with it working, it will be easy for them to figure this out and they tell you simply that you can feel free to buy a new one.  The sensor that they look for is called the Liquid Contact Indicator right inside where you slide your headphone.  Under the new policy the Apple staff cannot just determine it unable to be repaired based on the LCI reading, but once they open up the device they usually can figure it out.


If you have dropped the iPhone in a sizeable portion of water the first thing you will want to do is nothing.  Do not try to work with your iPhone at all as if it has gotten water into it any use of the iPhone will force the device to process from its energy source and could force it to short out.  This is a catch-22 since if you do not do anything to it then you may receive a phone call or notification, which could then short it out.  You have a choice to make then if you want to go ahead and actually turn off your iPhone, which you can do quickly by holding down the Wake and Home buttons simultaneously.  If it has a case on it then this should come off immediately, though many cases will protect it through this process.  This is especially true of the higher end of cases, such as the Otter Box.

From here you are going to want to give a sizeable amount of time to actually dry out the iPhone.  This can mean setting it in a dry and warm location at the very least, but you are going to need to know that it will take substantial time.  One of the most important things you can do to aid in this process is immediately put it into a bag filled part way with uncooked rice.  The rice will begin absorbing the moisture and you can let it set for a couple days.  Another method is to use a hair dryer on one of the lower settings, but whatever the option is you will need to do it for a substantial period of time to try to compensate for evaporation.  An additional option is to take a large number of Silica packets that are normally used in electronics or other commercial items that are shipping, and then put them in a back with the iPhone.

 For both of the absorption methods you are going to want to allow it 24-60 hours for drying before you take it out and attempt to restart it.  If you have gotten water behind the screen already it may be too late, though it is much more practical to change the touch screen than the entire iPhone.

Nokia Universal Secret Codes

 Nokia Universal Secret Codes:

Note: All codes donot work for all models.

Code Description 

          These Nokia codes will work on most Nokia Mobile Phones

(1) *3370# Activate Enhanced Full Rate Codec (EFR) – Your phone uses the best sound quality but talktime is reduced my approx. 5%

(2) #3370# Deactivate Enhanced Full Rate Codec (EFR) OR *3370# ( Favourite )

(3) *#4720# Activate Half Rate Codec – Your phone uses a lower quality sound but you should gain approx 30% more Talk Time.

(4) *#4720# Deactivate Half Rate Codec.

(5) *#0000# Displays your phones software version, 1st Line : Software Version, 2nd Line : Software Release Date, 3rd Line : Compression Type. ( Favourite )

(6) *#9999# Phones software version if *#0000# does not work.

(7) *#06# For checking the International Mobile Equipment Identity (IMEI Number). ( Favourite )

(8) #pw+1234567890+1# Provider Lock Status. (use the “*” button to obtain the “p,w”
and “+” symbols).

(9) #pw+1234567890+2# Network Lock Status. (use the “*” button to obtain the “p,w”
and “+” symbols).

(10) #pw+1234567890+3# Country Lock Status. (use the “*” button to obtain the “p,w”
and “+” symbols).

(11) #pw+1234567890+4# SIM Card Lock Status. (use the “*” button to obtain the “p,w”
and “+” symbols).

(12) *#147# (vodafone) this lets you know who called you last.

(13) *#1471# Last call (Only vodofone).

(14) *#21# Allows you to check the number that “All Calls” are diverted to

(15) *#2640# Displays security code in use.

(16) *#30# Lets you see the private number.

(17) *#43# Allows you to check the “Call Waiting” status of your phone.

(18) *#61# Allows you to check the number that “On No Reply” calls are diverted to.

(19) *#62# Allows you to check the number that “Divert If Unreachable (no service)” calls
are diverted to.

(20) *#67# Allows you to check the number that “On Busy Calls” are diverted to.

(21) *#67705646# Removes operator logo on 3310 & 3330.

(22) *#73# Reset phone timers and game scores.

(23) *#746025625# Displays the SIM Clock status, if your phone supports this power saving feature “SIM Clock Stop Allowed”, it means you will get the best standby time possible.

(24) *#7760# Manufactures code.

(25) *#7780# Restore factory settings.

(26) *#8110# Software version for the nokia 8110.

(27) *#92702689# Displays – 1.Serial Number, 2.Date Made, 3.Purchase Date, 4.Date of last repair (0000 for no repairs), 5.Transfer User Data. To exit this mode you need to switch your phone off then on again. ( Favourite )

(28) *#94870345123456789# Deactivate the PWM-Mem.

(29) **21*number# Turn on “All Calls” diverting to the phone number entered.

(30) **61*number# Turn on “No Reply” diverting to the phone number entered.

(31) **67*number# Turn on “On Busy” diverting to the phone number entered.

(32) 12345 This is the default security code.
Other Codes:
press and hold # Lets you switch between lines NOKIA 5110/5120/5130/5190 IMEI number: * # 0 6 #

Software version: * # 0 0 0 0 #

Simlock info: * # 9 2 7 0 2 6 8 9 #

Enhanced Full Rate: * 3 3 7 0 # [ # 3 3 7 0 # off]

Half Rate: * 4 7 2 0 #

Provider lock status: #pw+1234567890+1

Network lock status #pw+1234567890+2

Provider lock status: #pw+1234567890+3

SimCard lock status: #pw+1234567890+4 NOKIA 6110/6120/6130/6150/6190

IMEI number: * # 0 6 #

Half Rate: * 4 7 2 0 #

Software version: * # 0 0 0 0 # or * # 9 9 9 9 # or * # 3 1 1 0 #

Simlock info: * # 9 2 7 0 2 6 8 9 # NOKIA 3330 *#06#

*#0000# Shows your software version

*#746025625#This shows if your phone will allow sim clock stoppage

Restore Factory Settings:
To do this simply use this code *#7780#

Manufacturer Info:
Date of Manufacturing *#3283#

*3001#12345# (TDMA phones only) This will put your phone into programming mode, and you’ll be presented with the programming menu.

1) Select “NAM1″
2) Select “PSID/RSID”
3) Select “P/RSID 1″
Note: Any of the P/RSIDs will work
4) Select “System Type” and set it to Private
5) Select “PSID/RSID” and set it to 1
6) Select “Connected System ID”
Note: Enter your System ID for Cantel, which is 16401 or 16423. If you don’t know yours,
ask your local dealer for it.
7) Select “Alpha Tag”
8) Enter a new tag, then press OK
9) Select “Operator Code (SOC)” and set it to 2050
10) Select “Country Code” and set it to 302 for Canada, and 310 for the US.
11) Power down the phone and power it back on again


ISDN Code:
To check the ISDN number on your Nokia use this code *#92772689#

How to check china mobile IMEI number valid and original?

Here is a method by which you can check whether your phone has a valid and original IMEI number.

Mobile number without or wrong IMEI number are banned accorss India now. Mostly China mobile phone brands like Alkatel, Sigmatel, Spice, Carboonn, GFIVE and many more now provide valid IMEI number.

Check your China or any Mobile Phone's IMEI Number is Validity

1.Press *#06# on your mobile handset and note down the 15 digit IMEI number
2.Compose a new message from your mobile >> Type your 15 digit IMEI number >> Send it to 53232
3.If you get “Success” as the reply, then your mobile IMEI number is valid
4.If you get “Invalid IMEI” as the reply, that means your IMEI number is not valid
5.You are now done.

This will help you to know that your imei number is valid or not

LG Mobile Phone Secret Codes

 LG all models test mode

    Type 2945#*# on the main screen.
    2945*#01*# Secret menu for LG
    IMEI and SW (LG 510): *#07#
    Software version (LG B1200): *8375#
    Recount cheksum (LG B1200): *6861#
    Factory test (B1200): #PWR 668
    Simlock menu (LG B1200): 1945#*5101#
    Simlock menu (LG 510W, 5200): 2945#*5101#
    Simlock menu (LG 7020, 7010): 2945#*70001#
    Simlock menu (LG 500, 600): 2947#*


LG-U81XX SPECIAL CODES

 
Code to read phone version

- Phone without SIM
- Enter 277634#*# or 47328545454#
- Select 'SW Ver.info'

Code to reset phone

- Phone without SIM
- Enter 277634#*# or 47328545454#
- Select 'Factory Reset'

Code to enter UNLOCK MENU


- Phone wit SIM inside
- Enter 2945#*88110#
Test Menu 8330 : 637664#*#
Test Menu 8180 V10a: 49857465454#
Test Menu 8180 V11a: 492662464663#
Test Menu 8130-8138: 47328545454#
Test Menu 8110-8120: 277634#*

Hidden China Mobile Phone Codes

Here is a collection of the hidden China mobile secret codes used by technicians to check the functionality of your mobile.

The following Mobile Phones codes works with various China mobile Phones such as Alkatel, Sigmatel, Carboonn, GFive, and more such China Mobile phones.

Codes


    Default user code : 1122, 3344, 1234, 5678
    Engineer mode : *#110*01#
    Factory mode : *#987#
    Enable COM port : *#110*01# -> Device -> Set UART -> PS Config -> UART1/115200
    Restore factory settings : *#987*99#
    LCD contrast : *#369#
    Software version : *#800#
    Software version : *#900#
    Set default language : *#0000# Send
    Set English language : *#0044# Send
    Set English language (new firmware) : *#001# Send


Top 5 Mobile Security Concerns for 2013

The market share for traditional PC's is falling apart as smartphones and tablets are replacing the desktops. As millions of users shift from PC's to mobile devices, hackers and malware authors who once targeted PC ecosystems are focusing on attacking mobile devices, which are miniature PC's storing huge chunks of sensitive data. Therefore users need to be aware of potential security vulnerabilities and various methods to safeguard their valuable information on mobile devices more than ever. Although many users are familiar about PC security it seems that only few users are actually aware of ways to protect the smartphones and tablets from attacks. The following is a concise review on top 5 mobile security concerns for 2013.

Outdated Operating Systems

                Outdated operating systems pose serious security threats to the smartphones and tablets. With the current pace at which hardware components are stacked together to produce new and powerful devices each day, predecessors are losing the limelight at a rapid rate. The upgrades to the operating systems are not always compatible with the older phones; therefore a vast majority of users tend to stick with older versions of the OS. Also security patches to the identified threats and updates to existing versions are usually not installed properly by the average users due to their lack of concern over mobile security or lack of knowledge on installation processes. Another major issue especially relevant to Android OS which powers about 75% of the smartphones and tablets out there is its huge fragmentation, which causes upgrade processes dreadfully slow. In fact around 50% of the devices still run Gingerbread, while two major upgrades, Ice Cream Sandwich and Jelly Bean have already been rolled out.

Outdated Applications and Malicious Applications

                People are shifting from Desktop PC's to smartphones and tablet PC's and so are the hackers and malware authors. Malicious application codes are often bundled with popular free applications found on apps stores, or with pirated copies of paid versions, and average users hardly notice the spying bots disguised within a popular service. Most trusted services like Google Play and Apple iTunes Apps Store too have been injected with malicious apps despite various security barricades, therefore chances of various third party app stores and web sites being infected with malware are quiet high. User modified versions of operating systems often known as Custom ROMs are usually vulnerable to attacks more than official stock ROMs, since users often root the smartphones to gain the super-user access for installing custom ROMs, and rely on pirated versions of popular apps. These third party markets usually are not monitored closely for potential threats by a professional body therefore malware authors can easily distribute their apps coated with malicious codes without getting caught.

Exploited Wireless Networks
              Public wireless hotspots attract many savvy smartphone users looking for cheap data bundles and many prying eyes of malicious hackers looking for vulnerable targets. Network requests can be manipulated to redirect users to fake websites infected with malware or spyware exploiting the vulnerabilities of the network. User names, user passwords and even stored messages have been retrieved through public Wi-Fi networks without users consent in various occasions. Mobile phones are not typically equipped with firewalls to block insecure connections while surfing on a public Wi-Fi network, therefore potential intruders can steal sensitive data like credit card numbers and bank account numbers and hack into users’ email accounts as well. Using encrypted network connections at home and office, and avoiding accessing public Wi-Fi hotspots at airports and cafeterias are some basic precautions users can take to minimize security threats, until manufacturers and developers start bundling up security firewalls.

Rooting and Jailbreaking of Propriety Operating Systems

              Gaining super-user access to the operating systems by rooting or jailbreaking exposes the system to plethora of security threats. This process allows users to gain full administrative privileges, and install any application including the ones not recommended by the manufactures over security concerns. Rooted devices are easily manipulated by malware including worms, Trojans and various viruses to steal user names and passwords, contact lists, messages and hijack email accounts behind users back. Rooting devices void manufacturers’ warranty, therefore users are not notified of security patches and security updates once devices are rooted and users typically have to manually address such concerns.

Vulnerabilities in Device to Device Connections


              Device to device infections are quiet rare yet however that doesn’t mean they are impossible to be carried out. For instance malware authors can exploit the USB host feature introduced with Android Honeycomb for spreading malware. If the connected device’s USB debugging mode is turned on, chances of the device being infected with malware embedded in the host devices are quite high. This could either be accomplished by a bot running in the background of the host without the users’ consent, or by the owner of the infected host himself, by plugging the device into a target device and installing the malware on it. However it should be noted that device to device infections are quiet rare in earlier versions of Android which still powers up to 90% percent of the Android smartphones. It is also speculated that malware authors will utilize desktop PC's to spread smartphone malware in near future.

Useful Apps for Your Android Tablet

With the advancement of technology today, a lot of people are very much hooked in opting for the best and new gadgets, tools and applications too. Below are the list of most useful apps for ur Android Tablets.

Apps for your Android Tablet


1.) The productivity tool for Android tablets

          With this type of app you will be able to toggle settings from your profile options easily. You can easily change your profile screen, GPS off and on button using touch and volume control. This will be the best short cut key you can use especially during emergency situations.

2.) The barcode scanner

         When you go shopping, you can use this bar code scanner to know the price of the product, you don’t have to look for a bar code scanner inside the supermarket because you have your own that will determine the price and the quality of the product brand you chose. There are also times when the camera of your phone will serve as the scanning machine if you don’t have the special key for the bar code apps.

3.) Task killer free advance for cheap tablets


         This is best for people who are always on the go, it will close all apps that are not in use so that you will be able to preserve your battery life that will result in battery saving so you don’t have to always suffer from low battery.

4.) The AP apps

         This type of apps is usually about news. You can get local and foreign news from this apps and it will also get stories that are meant for offline reading.

5.) The Astrid

         This falls under the to-do list apps which will make you come up with a note pad that will make you level your priorities for the day, for the week and for monthly basis. You can set your things to do so that you will be reminded by an alarm every time it falls on the date of the note.

6.) The astro file manager

         This app will screen the files you will be saving on your device and some files will be automatically redirected to the SD card when the device’s memory is already full.

7.) The Bonsai blast


          This is a classic game that will entertain you because of its colorful bubbles you need to shoot and make it explode whenever the color matches in 3 consecutive rows. The graphics are great and it can also be very addicting.

8.) The apps uninstaller for cheap tablets

          This app is about uninstalling files in batches when you don’t need them anymore. It will be helpful to you when you want to delete files that are in batches.

Android Apps You Can't Miss This Year

Can't imagine your smartphone without OS Android? Then, you should probably know all popular and very useful Android applications that can help you improve your phone and make it more functional and exciting to use. Dozens of various Android apps can be found today, and their features are so different... It's up to you which ones to choose for your smartphone of course, but I would like you to read this short review of 10 new Android apps.

The chances are you know some of them already, but no Android user can miss them this year for sure!

So, this year your Android device won't live without:

1.) AdFree Android 0.8.47
         This app is impossible to miss, because it disables the display of advertising in your mobile applications and games, saving your Internet traffic, battery charge, and processor resources.

2.) Dolphin Browser HD
         This is one of the best browsers for OS Google Android 2.x and above. It is fast, easy to use, and it supports the management by gestures, multitouch, synchronization with Google Bookmarks, and downloading videos from YouTube. Dolphin Browser HD saves cache files to a memory card, so, it saves the main memory of your device. This browser also has a built-in Flash-Player.

3.) Dr.Web for Android 7.0

          This app provides protection for mobile devices running on OS Android 1.6/2.0/2.1/2.2/2.3/3.0/3.1/3.2/4.0.

4.) Droid Wall 1.5.7
          To manage all the applications that need access to the network, the Android system runs Droid Wall firewall. You can specify special settings for different applications with this program and restrict their access to the Internet. For example, you can set the application's access only for GPRS or Wi-Fi, as well as permission to work with two types of connections at once.

5.) QuickMark 4.2.1
          Perhaps, this is one of the most functional applications to read QR-codes. It has many functions to recognize a QR-code and work with it.

6.) Screenshot ER 2.3
         The name of this application says it all. It can take screenshots of your device screen.

7.) Skype
          Well, no comments here! This is the Android version of a famous voice calls program and text messanger. This is much cheaper than regular international calls, and if you have a wireless Wi-Fi, Skype calls become almost free. This app supports Wi-Fi, 3G and EDGE / GPRS networks. You can call both Skype numbers and regular mobile phones.

8.) SMS Reader 1.04
         This application will let you read SMS from another phone.

9.) Sound Hound
         As well as Shazam or Midomi, this applications find music online if you have a small sample of it.

10.) Universal AndRoot 1.6.2

        This is a good program to get roots for your smartphone! This is the perfect way to root your phone with one click only!

10 Best Educational Apps Of 2013

Today, the world is technology driven. Both students and teachers are highly dependent on the electronic gadgets such as tablets and computers for teaching. Thus, educational apps are becoming quite popular among everyone. With these apps, it is now easy to learn and teach any subject.


The top 10 educational apps


1.) i Storybooks:
         It is one of best reading apps, which is available for free. The pages of the books are in movie motion, and it is easy to turn up the pages while reading. Many books have been included in the app, and if you want, you can also choose to get the premium books.

2.) 50 Languages
        Those who want to learn different languages, this app can be the best option for them. It contains the audio and visual programs for learning 50 languages of different places. You can improve your pronunciation skill through the audio program.

3.) Kids ABC phonics Lite
      To enhance the reading curriculum of kids, Kids ABC Phonics is among the best learning games. Through this app, your kid can learn how to spell and blend the words. There are different levels of games, which make it useful for kids studying in higher grades.

4.) Kids Paint Free
        Preschool kids can learn through art in a very easy way. They love drawing and filling colors in them. Thus, this app provides a scope to import a photo and fill colors in them. The procedure is very simple. Hence, it is not very tough for pre-school kids to handle this app.

5.) Kids Numbers and Math Lite
       Preschool to elementary level kids can learn mathematics with this app in a very convenient manner. Different operations of mathematics such as addition, division, subtraction, multiplication, can be learnt without realizing them that they are studying.

6.) Advanced English & Thesaurus
         Learning English grammar is very important as it is the basics of the language. Different parts of speech, synonyms, verbs, and other topics included in the high school curriculum, can be learnt through it.

7.) AnyMemo Free
      It is considered to be the top most apps for the high school students. It is learning software with advanced and rich functions. You can learn several languages through the flashcard db.

8.) HomeWork
        This app helps the students to keep a track record of their homework. They can list their assignments, time-table, date of examination, important notes etc. This makes their learning procedure very easy and systematic.

9.) Splashtop Whiteboard
        It is a great app for group study. When teachers want to demonstrate some flash media to the whole class, it can be really a beneficial tool. Android tablets can be connected with Wi-Fi, which will enable all the students to watch at the same time on their individual tablets.
 
10.) Star Chart
        It is a great tool for the teacher to educate students about our universe. With this app, you can locate the exact position of the heavenly bodies in the universe even in the broad light.

Thus, whether it Android or iOS, educational apps are available for making the learning process much easier and faster than ever. You can buy these apps, so that education becomes easy and interesting at the same time.

Top Android Apps For CEO's

CEO's(Chief Executive Officer) are busy people. They are often on-the-go with hardly a chance to keep track of their schedule, expenses or sit down and answer an email. The right combination of Android apps, however, can make the life of a CEO much easier.

If you're so busy you can hardly keep track of your life, check out these top Android apps for CEO's:

The Business Calendar App

The name of this app says it all. The Business Calendar app is perfect for every CEO who can't keep their schedule straight.

This app will let you manage multiple daily agendas all at once from one home screen. You can search for specific events within the agenda, add recurring events to you calendar and add a variety of colors to different events to keep your schedule more organized.

The best part about the Business Calendar app is that it automatically syncs with your Calendar in Google Docs, allowing you to change your agenda even while you sit at your desk.

The Assistant App

The Assistant app is like having a personal assistant with you at all times, but without the high salary and nagging voice.

The Assistant works with simple voice commands. The app will help you find nearby restaurants, coffee shops and other points of interest, and it can help set a daily agenda and will allow you to add items whenever you want.

This app is perfect for CEO's who need to stay organized but want to have fun while doing it.


The Executive Assistant

If you're one for forgetting to check your emails or text messages, the Executive Assistant is the perfect solution to your problems.

This unique Android app automatically updates you on events that happen within your smartphone. The app will let you know when you've received a text message, a new email or missed a call. You can even reply to emails and text messages straight from the app's home screen.

Once you've downloaded The Executive Assistant, you will never miss an important text or email again.

Astrid Task

Astrid Task isn't no ordinary task and tracking app. This unique Android application allows you to create task groups, record different activities that must be completed within a certain time frame and delegate work to your employees. All you have to do is add employees to your group and begin sending them assignments. Once the task has been completed, you will be notified instantly.

Astrid Task will make sure that your employees receive their assignments in a timely matter, leaving them with little room for excuses as to why they didn't complete them.

How to get the above Apps

A simple search on google with the app name followed by "for Android mobile" will lead you to the download page.

How to Play Games without Graphic Card, Virtual Graphic Card

 Now you can play any game in your Computer (PC). with out any graphic card!!
Just Install this Software in your Computer(PC) and Play Games.

What it does is,it uses a part of your RAM as Graphics card memory. For example,if you got 1GB DDR2 RAM,then it’ll use 128MB of it as a Virtual Graphics card,and the remaining 896MB will be used as a regular RAM.

3D Analyze is a Graphics Card Emulator that can emulate all the feature of a 3d graphics card like pixelshader 1.1, 1.4, 2.0, bump maps and a lota stuff. If a game stops running on your system just because u dont have a graphics card, dont worry 3d analyze will do it for you.

Here is the download link of that software Click Here!

After downloading extract it and open 3DAnalyze.exe file.

You will see a window like this:


Next,click on Select option.
Browse and select the Game's .exe file.
Then select the VendorID and DeviceID from any one of the 4 graphics card models given as you see in the below image.


 Then select Run to play the game.

Please note that the .exe file is to be selected from the main folder,and not the shortcut present on the desktop.


Play PS2 Games On PC With PCSX2 free full version

PCSX2 is an open-source PlayStation 2 emulator for the Windows operating systems. In its latest stable release, many PS2 games are playable, and several games have full functionality. The main bottleneck in PS2 emulation is emulating the multi-core PS2 on a PC x86 architecture.


Features of PCSX2

- Recompilers for Emotion Engine (EE), Vector Unit 0 (VU0) and Vector Unit 1 (VU1). They are used to translate some parts of the original PS2 machine code into x86 machine code, speeding up emulation.

- Dual core support allows PCSX2 to use up to 2 CPU cores speeding up the emulator significantly.

- Proper SPU2 emulation helps reproduce PS2 audio or even enhanced audio on the PC.

- Full gamepad support makes it possible to emulate every Dual Shock 2 feature.

- Patch system to create cheats easily. It can also be used to skip code where emulation is still broken. This feature is quite user-friendly and easy to use.

- Additional optimizations to speed up emulation. You will be able to play certain games on lower-end machines thanks to this feature.

- Fully working memcard support.

- Fully working IPU support responsible for FMV - video cutscenes should mostly run correctly.

Here is the Download link Click Here

Cheat Book 2012 For All PC Games

Cheat book is a must needed tool for gamers. Cheat book 2012 contains cheats for games released from 1998-2012 in alphabetical order.

Cheat Book Data Base 2012 - The encyclopedia of game cheats. A die hard gamer would get pissed if they saw someone using cheats and walk through in games, but you have to agree, sometimes little hint or the "God Mode" becomes necessary to beat a particularly hard part of the game. If you're an avid gamer and want a few extra weapons and tools the survive the game, Cheat Book Data Base is exactly the resource you would want.

You can download it from here.

Best Android Games


Hi Friends i would like to share some of the best Android games in this post . These games are rated as best in the Android market and are free of cost so by clicking the game name from the below list you can get into the download page directly and enjoy the best android experience with these top android games.

Top 10 Android Games

  1.  Paradise Island
  2. Angry Bird Rio
  3. Yoo Ninja! Free
  4. Paper Toss
  5.  Bubble Blast2
  6.  World War™
  7.  Slice It!
  8.  Live Holdem Poker Pro
  9.  Jewels
  10.  Mouse Trap Alchemy

How To Download Very Big Files Within Minutes?


Hi friends, i found an interesting way to reduce the download time and to save data by using Highly Compressed versions of the files that i would like to download.
For example take a game which you like the most & whose installation file is about 6GB, Think How much time will it consume to download 6Gb & Your reaction for it?

Now after reading this post you find an interesting way to stop worrying about the download time.
It's simple Just while searching for something which would be very big, Just add the keyword "Highly Compressed" with your search term, That's it!

For example if you are looking to download the game "Need for speed" search as below:

Need for speed Highly compressed


The above search will yield you with a no. of sites offering the download of the compressed version of that game. You will find that those big games which are about 5 to 6 GB are compressed to about just 10 to 20 MB.

You too can do this by using this software KGB Archiever. But be aware that this software will use lot of memory during the compression process and slow down your computer to the atmost level. (Better avoid this work if you think your pc cannot withstand this).

How to use the Highly Compressed Download:

Basically in case of games the compressed folders can be extracted by normal softwares like winrar, 7-Zip, etc.. But, On uncompressing you will note that the file will be in .iso format. So you may need to mount it to a virtual drive to open the .iso format file, and to play the game.

Don't worry there is a software named DAEMON Tools Lite to simplify this work for you.

How to use Daemon tools lite:

  1.     Just download the daemon tools lite form Here.
  2.     Install it.
  3.     On installing it you will find an additional drive on your My Computer.
  4.     Open Daemon tools lite.
  5.     Click Mount and select the .iso file to be mounted.
  6.     You will see the mounted files on that new drive on My Computer.
  7.     Open the drive and enjoy.

MS Excel LEFT, MID, RIGHT Functions: How To Slice Up Cell Contents

Why would anybody want to automate slicing up cell contents in a spreadsheet? If you ever tried to copy a list from a web page or from a .txt file and paste it into Excel with the purpose of creating a database, then you know how frustrating it is to go through cells and edit them one by one. I’ll give you the first example that pops into my mind: you have a list of people, you have the name, surname and age of each person in a single cell, but you need to put them in a separate cells, in order to be able to order your table by surname or by age.

When importing .csv or .txt files into Microsoft Excel, you are presented the option to choose your field delimiters. Sometimes this is enough to get your information imported just the way you need it. However, field delimiters don’t offer much flexibility, so you need to further process Excel cells content in order to be able to use it. Such processing can be done by using Text functions. LEFT, RIGHT and MID are the three functions which, in combination with a few others, will save you heaps of time. To show you how to do it, I’ll use the previous example with the list of names. I’ll first detail on each function used, then I’ll show you how to combine functions.

This is the initial spreadsheet:


We need our one column table to be split in three columns, for name, surname and age. By using the LEFT function we can “tell” Excel to return a certain number of characters only, so we can obtain a new column containing only names.

The syntax is LEFT(text,num_chars). This means that we need to indicate two parameters:

  •     the text we need to operate the cut on
  •     the number of characters that will be cut and pasted into the new cell 
Do you see where the problem is? Not all names on the list have the same number of characters, so we can’t just write the formula for the first cell, then drag it down onto the whole table. We need to enter a different number for each line, and that’s not at all a time saver. What if we found a way to automatically count the number of characters in each name, then use this variable in our LEFT formula, so it cuts the proper number of characters for each line?

There’s a function called FIND, which counts the number of characters in a text starting from a certain position to a special character you indicate. The special character in our case is the “space” between name and surname.
Function syntax: FIND(find_text; text; position)

Parameters:

    find_text = your special character (in this case it’s “space”)
    text = the initial text string (here you’ll want to put its cell reference, so you can then drag your formula down across the whole table)
    position = the position you need to start counting from (this parameter is optional, the formula will work even if you leave it out).

Here’s my table again, but this time I added the following columns


= FIND(” “;A2) – this is to determine how many characters are there in the first name (it will also count the space, so you’ll need to subtract it in the next formula) – we just count the characters to the left of the space

= FIND(” “; A2; B2+1) – this is to count the number of characters from the beginning to the second space in the text (I used B2+1 as starting position, so the formula ignores the first space)

= LEN(A2) – this counts the total number of characters in the text string. We need it for obtaining the age column with the help of the RIGHT function

Then we use the three aids we just defined to obtain our final columns:

    Name: =LEFT(A2;FIND(” “;A2)-1)
    Surname: =MID(A2;B2;C2-B2)
    Age: =RIGHT(A2;D2-C2)

Now that we know how to do it, why not combine the formulas so we skip the aid columns? All you need to do is replace B2, C2 and D2 with their corresponding formulas, drag the formulas all way down the table and you’re done:

    Name: =LEFT(A2;FIND(” “;A2)-1)
    Surname: =MID(A2;FIND(” “;A2);FIND(” “; A2; FIND(” “;A2)+1)-FIND(” “;A2))
    Age: =RIGHT(A2;LEN(A2)-FIND(” “; A2; FIND(” “;A2)+1))

This is how you can count characters to the left of a specific character in a text, so you can cut the text where you need. I hope it will help some of you out of trouble. It works in MS Excel, but also in OpenOffice Calc (which is what I used for this tutorial). Please let me know if you used this formula combination and how it worked for you.


Electronics Projects

Pulpit rock